W hen you implement a new class, it's useful to have a small interactive test program to help you test the class methods. Such a program can be written as a Java applet, which is a Java program written in a special format to have a graphical user interface. The graphical user interface is also called a GUI (pronounced "gooey"), and it allows a user to interact with a program by clicking the mouse, typing information into boxes, and performing other familiar actions. With a Java applet, GUIs are easy to create even if you've never run into such goo before.
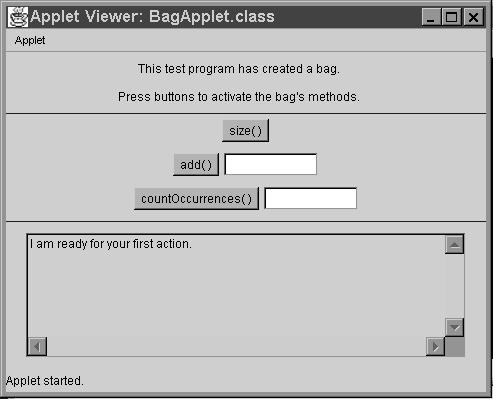
This section shows a pattern for developing such applets. To illustrate the pattern, we'll implement an applet that lets you test three of the bag's methods ( size , add , and countOccurrences ). When the bag applet starts, a GUI is created, similar to the drawing here:
By the way, the word "applet" means a particular kind of Java program, so you might show the drawing to your boss and say "My applet created this nice GUI." But you can also use the word "applet" to talk about the GUI itself, such as "The applet in this drawing has three buttons in its middle section." And in fact, there are three buttons in that applet--the rectangles labeled size( ) , add ( ) , and countOccurrences( ) .
In these notes, we'll suppose that you have written the IntArrayBag class described in the IntArrayBag documentation.
The applet in the above drawing is intended to be used by the programmer who wrote the IntArrayBag class, to interactively check that the class is working correctly. When the applet starts, two sentences appear at the top: " This test program has created a bag. Press buttons to activate the bag's methods. " Above these sentences are some extra items. The display above our sentences is automatically created by the applet display mechanism. The exact form of this display varies from one system to another, but the dark bar across the top generally contains controls such as the X in the top right corner. Clicking on that X with the mouse closes the applet on this particular system.
A series of "buttons" appears in the middle part of the applet In order to test the bag, the user clicks on the various buttons. For example, the user can click on the size button and a new message will appear in the large text area at the bottom of the applet. The message will tell the current size of the bag, as obtained by activating the size( ) method. If you click on this button right at the start, you'll get the message " The bag's size is 0. "
The user can also activate add or countOccurrences , but these methods each need an argument. For example, to add the number 42 to the bag, the user types the number 42 in the white box next to the add button, then clicks the add button. Try that now, with this version of the BagApplet, embedded in this HTML page:
After elements have been added, the user can test countOccurrences . For example, to count the occurrences of the number 10, the user types 10 in the box by the countOccurrences button and then clicks the countOccurrences button. The applet activates countOccurrences(10) and prints the method's return value in the large text area at the bottom.
Anyway, that's the behavior that we want. Let's look at the Java programming techniques to produce and run such an applet.
Here is outline for the Java code of the applet which tests the IntArrayBag. The same outline can be used for an applet to interactively test any class.
// FILE: BagApplet.java | ||||||||||||
|
1. Import statements. These statements import the class that is being tested and also the Java classes that are needed by the applet. For this applet, we must import the IntArrayBag class: import edu.colorado.collections.IntArrayBag;Most applets will also have these three import statements: import java.applet.Applet; // Provides the Applet class. import java.awt.*; // Provides Button class, etc. import java.awt.event.*; // Provides ActionEvent, ActionListener | ||||||||||||
The code has six parts which we'll discuss now.
As with any Java program, we begin with a collection of import statements to tell the compiler about the other classes that we'll be using. In the case of the bag applet, we import the IntArrayBag class by using the statement:
import edu.colorado.collections.IntArrayBag;Most applets also have these three import statements:
   import java.applet.Applet;
   import java.awt.*;
   import java.awt.event.*;
After the import statements, we define a class, much like any other Java class. This class definition begins with the line:
public class IntArrayBag Applet extends AppletThe class definition continues down to the last closing bracket of the file. The class for the bag applet is called BagApplet, which is certainly a good name, but what does " extends Applet " mean? It means that the BagApplet class will not be written entirely by us. Instead, the class begins by already having all the non-private methods of another class called Applet . We imported the Applet class from java.applet.Applet , and it is provided as part of the Java language so that a class such as BagApplet does not have to start from scratch. The act of obtaining methods from another class is called inheritance. The class that provides these methods (such as the Applet class) is called the base class, and the new class (such as BagApplet ) is called the extended class. Chapter 13 studies inheritance in detail, but for now all you need to know is that the BagApplet obtains a bunch of methods from the Applet class without having to do anything more than " extends Applet ."
At the top of the class we define an IntArrayBag instance variable:
private IntArrayBag b = new IntArrayBag( );This bag, b, will be manipulated when the user clicks on the applet's buttons. In general, an interactive test applet will have one or more objects declared here, and these objects are manipulated by clicking the applet's buttons.
An applet's components are the buttons and other items that are displayed when the applet runs. These components are declared as instance variables of the class. Our bag applet has several kinds of components: buttons (such as the size() button), text fields (which are the white rectangles next to some of the buttons), and a text area (which is the large rectangle in the bottom third of the applet). In all, there are six important components in the bag applet, represented by these six instance variables:
   Button    sizeButton             = new Button("size( )");
   Button    addButton              = new Button("add( )");
   TextField elementText            = new TextField(10);
   Button    countOccurrencesButton = new Button("countOccurrences( )");
   TextField targetText             = new TextField(10);
   TextArea  feedback               = new TextArea(7, 60);
All the instance variables are declared near the top of the class definition, before any of the method definitions. They cannot have the usual private access because they'll be accessed from other classes that we'll see shortly. But before that, let's look at the three kinds of components: button, text field, and text area.
Button sizeButton = new Button("size( )");
The bag applet has three
Button
objects:
sizeButton
,
addButton
, and
count-OccurrencesButton
.
TextField elementText = new TextField(10);The elementText text field can hold about 10 characters. The user can actually type beyond 10 characters, but only 10 characters of a long string will be displayed. We plan to display elementText right beside the add button. To test the add method, the user will type a number in the text field and click on the add button.
TextArea feedback = new TextArea(7, 60);This large text area appears at the bottom of the applet. The intention is to use the text area to display messages to the user.
The declarations we have seen created the three kinds of components: Button , TextField , and TextArea . All three classes are part of the java.awt package that is imported by our applet. When we declare a button (or other component) and create it with the constructor, it does not immediately appear in the GUI. How do the objects get placed in the GUI? Also, how does the applet know what to do when the user clicks on a button or takes some other action? The answers to these two questions lie in a special applet method called init , which we'll discuss next.
A Java application program has a special static method called main . A Java applet does not have main . Instead, an applet has a special nonstatic method called init . When an applet runs, the runtime system creates an object of the applet class, and activates init( ) for that object. There are several other applet methods that the runtime system also activates at various times, but an interactive test program needs only init .
Our init method carries out four kinds of actions:
add(sizeButton);
As components are added, the GUI fills up from left to right. If there is no room for a component on the current line, then the GUI moves down and starts a new row of components. Later you can learn more sophisticated ways of laying out the components of a GUI, but the simple left-to-right method used by an applet is a good starting point.
add(new Label("This test program has created a bag"));
The
Label
constructor has one argument, which is the string that you want to display. The add method will put the message in the next available spot of the GUI.
   addNewLine addHorizontalLine
   void addNewLine( );
   void addHorizontalLine(Color c);
The addNewLine method forces the GUI to start a new line, even if there's room for more components on the current line. The second method, addHorizontalLine , draws a horizontal line in the specified color. We'll have to define these two methods as part of BagApplet.Java , but they won't be difficult. (The data type Color is part of java.lang . It includes Color.blue and twelve other colors plus the ability to define your own colors.)
   append
   feedback.append("I am ready for your first action.\n");
This causes the message "
I am ready for your first action.
" to be written in the
feedback
text field (with a newline character
\n
at the end of the message).
The most important method for buttons involves a new kind of object called an action listener. An action listener is object that an applet programmer creates to describe the action that should be taken when certain events occur. Our bag applet will have a different kind of action listener for each of the three buttons:
|
Describes the actions to be taken when sizeButton is clicked. |
||
|
Describes the actions to be taken when add Button is clicked. |
||
|
Describes the actions to be taken when countOccurrencesButton is clicked. |
Each kind of action listener is actually a new class that we'll define in a moment. But the only thing you need to know for the init method is how to connect an action listener to a Button . The solution is to activate a method called addActionListener for each Button . For example, to connect sizeButton to its action listener, we place this statement in the init method:
sizeButton.addActionListener(new SizeListener( ));
Notice that addActionListener is a method of the Button class, and its one argument is a new SizeListener object. Of course, we still need to implement the SizeListener class, as well as the other two action listener classes. But first, let's summarize all the pieces that are part of the init method for the BagApplet . Within init , we expect to activate these methods to carry our work:
The complete init implementation is shown in BagApplet.java. That code uses just one method that we haven't yet mentioned. That one method ( setEditable ) is summarized in this table along with the other applet-oriented methods that we have used or plan to use:
| Methods to Call from an Applet or from a Class That Extends an Applet | |
add(component)
| The component may be any of Java�s AWT components such as Button, TextArea, or TextField. As components are added, the applet fills up from left to right. If there is no room for a component on the current line, then the applet moves down and starts a new row of components. |
addNewLine()
| These are not actually Applet methods�you�ll need to define them if you want to use them. |
| Constructors for Three Useful Applet Components | |
Button(String label)
| Creates a button with a given label. |
TextField(int size)
| Creates a white box for the user to type information. The size is the number of characters. |
TextArea(int rows, int columns)
| |
| Six Useful Methods for a Component | |
b.setActionListener (ActionListener act)
| We use b.setActionListener for a Button b. The ActionListener, act, describes the actions to take when the Button b is pressed. |
t.append(String message)
| We use t.append for a TextArea t. The specified message is added to the end of the TextArea. |
t.getText()
| We use t.getText for a TextField t. The method returns a copy of the String that the user has typed in the field. |
t.setEditable (boolean editable)
| The component t can be a TextArea or a TextField. The boolean parameter tells whether you want the user to be able to type text into the component. |
t.requestFocus()
| We use these methods with a TextField. The requestFocus method causes the mouse to go to the field, and selectAll causes all text to be highlighted. |
c.setSize (int width, int height)
| This method may be used with any component c. The component�s width and height are set to the given values in pixels. |
Here's the Java syntax for defining an action listener class--the blank line is filled in with your choice of a name for the action listener class.
   class _______________ implements ActionListener
      void actionPerformed(ActionEvent event)
      {
         ...
      }
   }
The phrase " implements ActionListener " informs the Java compiler that the class will have a certain method that is specified in the ActionListener interface that is part of java.awt.* . The method, called actionPerformed , is shown with "..." to indicate its body. The actionPerformed method will be executed when an action occurs in the action listener's component, such as clicking a button. For example, here is the complete definition of the action listener that handles the clicking of the size() button of our test applet:
   class SizeListener implements ActionListener
      void actionPerformed(ActionEvent event)
      {
         feedback.append("The bag has size " + b.size( ) + ".\n"");
      }
   }
This declares a class called SizeListener , which includes its own actionPerformed method. For most classes, the class definition would go in a separate file called SizeListener.java . But a separate file is undesirable here because the actionPerformed method needs access to two instance variables: the bag b and the text area feedback . The necessary access can be provided by placing the entire SizeListener definition within the BagApplet . This is an example of an inner class, where the definition of one class is placed inside of another. An inner class has two key properties:
So, by making SizeListener an inner class, the actionPerformed method can activate feedback.append to print a message in the feedback component of the applet. The message itself includes an activation of b.size( ) , so an entire message is something like "The bag has size 42."
|
By the way, the actionPerformed method has a parameter called event . For more complex actions, the event can provide more information about exactly which kind of action triggered the actionPerformed method.
Once an action listener is created, it must be registered with its particular button. The registration is made in the init method. Our applet had these three statements to register the three ActionListener objects:sizeButton.addActionListener(new SizeListener( )); addButton.addActionListener(new AddListener( )); countOccurrencesButton.addActionListener (new CountOccurrencesListener( ));For example, the first of these statements creates a new SizeListener and registers it with the button sizeButton .
Let's look at the second action listener class for our applet: AddListener . This action listener handles the actions of addButton , which is in the middle of the applet with a TextField that's right beside it. What actions should occur when the user clicks the addButton ? The text should be read from the TextField . This text is a String , such as "42", but it can be converted to its value as an integer by using the Java method Integer.parseInt . The method Integer.parseInt has one argument (a String which should contain an integer value), and the return value is the int value of the String . Once we know the value of the integer provided by the user, we can add it to the bag b and print an appropriate message in the applet's feedback area. Following these ideas, we have this first try at implementing AddListener:
   class AddListener implements ActionListener
   {
      void actionPerformed(ActionEvent event)
      {
         String userInput = elementText.getText( );
         int element = Integer.parseInt(userInput);
         b.add(element);
         feedback.append(element + " has been added to the bag.\n");
      }
   }
The
actionPerformed
method defined here uses three of the applet's instance variables: (1)
elementText
, which is the
TextField
where the user typed a number; (2) the bag
b
, where the new element is added; and (3) the
TextArea
feedback
, where a message is printed providing feedback to the user.
The method works fine, though a problem arises if the user forgets to type a number in the TextField before clicking the button. In this case, a Number-FormatException will occur when Integer.parseInt tries to convert the user's string to an integer. The best solution to this problem is to "catch" the exception when it occurs, rather than allowing the exception to stop the applet. The syntax for catching a NumberFormatException looks like this:
   try
   {
      ...code that might throw a NumberFormatException...
   }
   catch (NumberFormatException e)
   {
      ...code to execute if the NumberFormatException happens...
   }
The words
try
and
catch
are Java keywords for handling exceptions. The full power of
try
and
catch
are described in van der Linden's book.
For our purposes, we'll follow the preceding pattern to write a better version of
AddListener:
   class AddListener = implements ActionListener
   {
      void actionPerformed(ActionEvent event)
      {
         try
         {
            String userInput = elementText.getText( );
            int element = Integer.parseInt(userInput);
            b.add(element);
            feedback.append
               (element + " has been added to the bag.\n");
         }
         catch (NumberFormatException e)
         {
            feedback.append
               ("Type an integer before clicking button.\n");
            elementText.requestFocus( );
            elementText.selectAll( );
         }
      }
   }
If a
NumberFormatException
occurs, then the code in the
catch
block is executed. This code prints a message in the feedback area of the applet, then activates two methods for
elementText
(which is the
TextField
where the user was supposed to type a number):
   elementText.requestFocus( );
   elementText.selectAll( );
The requestFocus method causes the mouse cursor to jump into the TextField , and the selectAll method causes any text in the field to be highlighted. So now, if the user forgets to type a number, the applet will print a nice error message and provide a second chance.
Our applet needs one more action listener for the countOccurrences button. That implementation is part of BagApplet.java
Our applet has two other methods that we've mentioned: (1) addHorizontalLine , which draws a horizontal line in a specified color; and (2) addNewLine , which causes a new line to start in the GUI, even if there's room for more components on the current line.
Our addHorizontalLine doesn't really draw a line. Instead, it adds a component called a Canvas to the applet. A Canvas is another applet component, like a Button , primarily used for drawing graphical images. The size of the Canvas can be set in pixels, which are the individual dots on a computer screen. Today's typical screens have about 100 pixels per inch, so a Canvas that is only one pixel high looks like a horizontal line. Here's our implementation:
   private void addHorizontalLine(Color c)
   {
      // Add a Canvas 10000 pixels wide but
      // only 1 pixel high, which acts as
      // a horizontal line.
      Canvas line = new Canvas( );
      line.setSize(10000, 1);
      line.setBackground(c);
      add(line);
   }
Notice that the Canvas is 10,000 pixels wide, which is wide enough to span even the largest applet--at least on today's computer screens.
Our last method, addNewLine , works by calling addHorizontalLine with the color set to the background color of the applet. In effect, we are drawing a horizontal line, but it is invisible since it's the same color as the applet's background.
The implementation of addNewLine is given in BagApplet.java as part of the complete applet. Look through the whole applet with an eye toward how it can be expanded to test all of the bag's methods or to test a different class.An applet can be compiled just like any other Java program. For example, using the Java Development Kit we can compile BagApplet.java with the command line:
javac BagApplet.javaYou may have some other way of compiling Java programs in your development environment, but the result will be the same. The act of compiling produces the file BagApplet.class. The compilation will probably produce three other files with names such as BagApplet$SizeListener.class . These are the compiled versions of the inner classes.
Applets were actually created to run as part of a page that you view over the Internet with a web browser. These pages are called html pages, which stands for "hyper-text markup language." So, to run the BagApplet, we need a small html file. The file, called BagApplet.html, should be created by you in the same directory as BagApplet.class, and it should contain the two lines of html code shown here:
   <applet code="BagApplet.class" width=480 height=340>
   </applet>
The first line, containing <applet...> tells the web browser that you are going to start an applet. Usually, you will have at least three pieces of information about the applet:
|
Sets the applet's size in pixels. Today's typical screens have about 100 pixels per inch, so a size of 480 x 340 is about 4.8 inches by 3.4 inches. |
Many Java development environments have a feature to automatically create a small html file such as this.
Once the html file is in place, you can run the applet in one of two ways. One approach is to run an appletviewer, which is a tool that reads an html file and runs any applets that it finds. The Java Development Kit has an appletviewer that is executed from the command line. For example, to run the JDK appletviewer you change to the directory that contains BagApplet.html and type the command:
appletviewer BagApplet.htmlThis command runs the applet. The applet can also be displayed by putting the class and html files in a location that's available to your web browser .
Our test applet needed to define only the init method. More complex applets can also be created, involving graphical images plus interaction. Graphical applets will generally provide other methods called start , paint , update , stop , and destroy . A good resource is Graphic Java Mastering the AWT by David M. Geary.